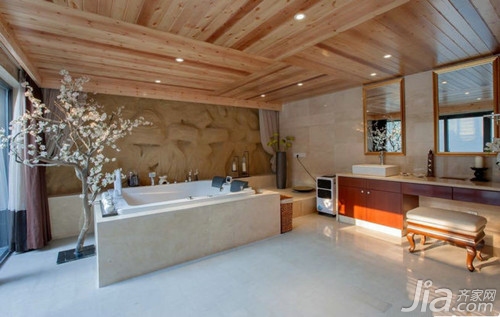
The ceiling of the sauna panel can play a vital role in beautifying the space and concealing the original building defects. It has become an important part of the renovation of new houses. It not only enriches the shape but also has an atmosphere. Sauna board ceiling construction process is how, the following small series simple introduction to the construction of the sauna board ceiling construction process and pay attention to it. · Sauna board ceiling construction technology 1, purchase The first step in installing a wooden sauna board is to measure ceilings and sample planks from your local home improvement store to determine how much sauna board you need. You should add an extra 15% of measurement errors and redundant explanations. 2, find the bolt Using the stud finder, found nailed to the ceiling. Use a pencil to mark the ends, then make the chalk line from one end to the other. Your ceiling is vertically mounted on the ceiling keel. 3, preparation Clear all the furniture from the room and any or trim molding, this will be the way of the item, be sure to carefully clean it. You can practice putting together a sauna board on the floor to make sure everything is correct or not practiced and you can start installing. 4, install You need pre-drilling and attachments for your sauna board to tidy up your nails. Start your project in a corner of the ceiling and your way out in the room. The first piece must be nailed to the wall with the tongue facing outward. The following works will be nailed to the tongue at the angle of the ceiling joists. Continue to install on the sauna board until it covers the entire ceiling. 5, complete Once your sauna board is all in place, find the gap between the panels of the sauna. With caulking, the color of the wood you use matches the seams of any nail holes or crevices between the boards. Wipe excess caulk. ·Sauna board installation ceiling attention 1 It is best to spliced ​​the boards immediately after cutting the same package of sauna boards. Because there are errors in the concave and convex grooves in different sauna board packages, and with different expansion coefficients, it is very difficult to plug in some different packages. 2 Be sure to note that the edges of the plate that you are about to cut and the edges of the upper plate should be aligned. I am mistaken for three plates. The concave edge is the concave edge. Fortunately, the plate is not that bad. 3 There is always a change in the rate of the sauna board. If all the joints are deformed, the deformation resistance is better. However, when cutting, it is necessary to pay attention to that some of the boards are already deformed on the long side, and they are not tightly connected. This board should be picked out early. Used on some short sides that need to be spliced. The relevant information about the construction technology of the ceiling of the sauna plate was introduced here for everyone. I hope this article will help you. If you still have anything you don’t understand, you can follow our website and we’ll get back to you as soon as possible. Chinese corridor ceiling living room ceiling decoration renderings Mediterranean indoor ceiling two bedroom ceiling villa living room ceiling
Calcium Chloride Dihydrate
formula is CaCl2 · 2 (H2O) ,also named Calcium Chloride Pellets 74%, Calcium
Chloride dihydrate 77%, White Pellet Calcium Chloride.
Usage: Dihydrate Calcium
chloride can be used as a multipurpose desiccant, de-icing and dust control. ts
aqueous solution is for the use of cold mixing machine and ice making important
refrigerant, buildings, etc.
Calcium Chloride Dihydrate Calcium Chloride Dihydrate,Calcium Chloride Flakes,Industry Grade Calcium Chloride Dihydrate,Calcium Chloride Dihydrate Granular Weifang Xinchang Chemical Co.,Ltd , http://www.xinchangchem.com